Bike brake adjustment methods help keep your brakes quiet, centered, and responsive. They set pad position, cable tension, and wheel alignment for cleaner stopping. They also cut rub and squeal before those problems get worse. Done right, they give you a firmer lever and a smoother ride.
How to Inspect Bike Brakes
Before you start turning bolts or tweaking cables, check the bike itself, because a brake system can only work well once the wheel sits straight in the dropouts. Then do a quick safety check with spinning each wheel and watching the gap around the brake pads.
You’re looking for even space, no scraping, and no wobble. Next, feel the brake lever. It should move smoothly, not sink too far. Look closely at the pads for brake wear, since thin pads can hide bigger problems.
Also, inspect the rotor or rim for bends, dirt, or shiny rub marks. Should the wheel sit true and the parts look clean, you’re already halfway there. That simple habit helps you catch trouble early, keep your group rides calmer, and trust your brakes once the road gets lively.
Adjust Brake Pads for Better Contact
Whenever the pads are the real problem, a small adjustment can make your brake feel calm again instead of sketchy and grabby.
You want each pad to meet the rim squarely, not ride high, low, or off to one side. Loosen the pad bolt, then nudge the shoe until the pad contact points sit flat and even. Keep an eye on braking surface coverage, because the pad should touch the rim, not the tire.
Squeeze the brake lever while you set it, so the pads match real stopping force. Then tighten everything and spin the wheel to check for smooth, steady contact. Whenever one pad bites harder, shift it a little more. That’s how you join the ride instead of fighting it.
Center Rim Brake Calipers
A centered rim brake caliper can make a bike feel calm, quiet, and much easier to trust. You can start by checking caliper spacing, because both arms should sit evenly around the rim.
Then look at pad centering and make sure each pad meets the braking surface at the same time. If one side sits closer, loosen the mount slightly, squeeze the brake, and retighten so the caliper settles in place.
Next, spin the wheel and watch the gap from above. You want smooth clearance, not rubbing or a crooked look. Small changes matter here, and they help your brakes feel balanced.
When the caliper lines up well, you get cleaner stops, less noise, and a ride that feels like it belongs to you.
Adjust Cable Tension
Start by checking for cable slack, since too much play can make your brake feel vague and slow to respond.
Then use the barrel adjuster in small turns to bring the pads closer or farther from the rim until the lever feels even and smooth.
You want both sides to share the load, so balance lever reach and cable tension together for cleaner, more confident braking.
Cable Slack Check
1 simple cable slack check can save you from a mushy brake lever and that slightly nerve-wracking moment whenever the bike doesn’t respond right away.
You’re not alone if the lever feels lazy after some rides. First, squeeze it and watch for too much free movement. Then feel the cable at the brake arm. If it shifts a lot, cable stretch may have loosened things. If the lever still feels vague, housing friction may be slowing the pull.
Next, make sure the cable sits cleanly in its stops and moves without binding. Small changes matter here. A little less slack gives you a firmer feel and helps you trust your bike again. When your brakes answer fast, you ride with more calm and confidence.
Barrel Adjuster Turns
The barrel adjuster gives you a simple way to fine-tune cable tension without reaching for tools every time. You join a quick bike fix, not a solo repair struggle. Turn it clockwise to add tension, or back it out whenever the brake feels too tight. That small change helps with barrel adjuster indexing, so your brake stays crisp as the cable settles. Whenever you notice cable tension drift after rides, give the adjuster a tiny turn and test again. | Turn | Effect |
| — | — |
|---|---|
| Clockwise | Adds tension |
| Counterclockwise | Reduces tension |
| Small turn | Keeps control |
| Test ride | Confirms feel |
| Repeat | Builds confidence |
Use short turns, then squeeze the lever and roll the wheel. Whenever the feel matches your pace, you’ll know you’re in the right place.
Lever Reach Balance
You can use cable tension to fine-tune lever reach, and that makes the brake feel safer and easier to trust.
When you turn the barrel adjuster, you change how far the lever moves before the pads bite.
Whenever the lever sits too close to the bar, add tension to improve lever comfort and shorten finger travel. Whenever the lever feels too stiff or grabs too soon, back off a little.
Make each change in small steps, then squeeze the lever and test the feel.
You want both sides to respond smoothly, so your hand stays relaxed and confident on every ride.
This simple balance helps you match the brake to your grip, and that’s a nice place to be.
Set Brake Lever Reach
When the reach feels right, you’ll keep better control, brake more comfortably, and stay confident on rough rides.
Start with a small change, then fine-tune until the lever matches your hand shape and grip style.
Lever Reach Basics
If your brake lever feels too far away or too close, a simple reach adjustment can make riding feel safer and a lot more comfortable. You deserve lever reach ergonomics that fits your hands, because a good setup supports lever reach comfort and steady control.
Start by finding the small reach screw or dial near the lever. Turn it a little at a time, then squeeze the lever and feel the change. The lever should sit where your fingers can wrap it without strain.
Should you share your bike with others, adjust it for your own grip before each ride. Small changes matter, and they help you feel at home on the bike. After that, check that both levers feel similar, so your setup stays balanced.
Hand Position Fit
As soon as your brake lever sits in the right place, your hands relax and your riding feels a lot more natural. You start to trust the bar again, and that calm feeling helps on busy streets and steep descents.
Set the reach so your fingers rest on the lever without stretching or curling too hard. That simple fit supports better hand position and cleaner lever ergonomics, so each squeeze feels steady instead of awkward.
If the lever feels too far away, your grip gets tense. If it sits too close, you might lose control. Make small changes, then hold the bars and test how it feels in a normal riding stance.
Once the fit matches your hand, you’ll brake with less strain and more confidence.
Fine-Tune Reach Range
A good lever fit gives you the comfort, but fine-tuning the reach is what makes the brake feel truly yours. You can dial the lever closer or farther until your fingers rest there without strain.
Start with the initial knuckle on the blade, then test reach comfort by squeezing hard while seated on the bike. If the lever sits too far away, your hand stretches and power drops. If the lever sits too close, your grip ergonomics suffer and you may grab too much lever too fast. Use the reach screw or dial in tiny steps, then check both sides.
You want smooth control, quick response, and a familiar feel that helps you ride with confidence in the pack.
Fix Brake Rub and Squeal
Brake rub and squeal usually start with a small setup issue, not a major bike problem, so don’t panic. You can calm the noise via checking wheel trueness and rotor contamination initially. A slightly bent rotor or oily pad face often makes the brake whisper, then squeal like it’s asking for attention. Wipe the rotor with clean alcohol, and clean your hands before touching pads. Then spin the wheel and listen.
| Check | Fix |
|---|---|
| Dirty rotor | Clean it well |
| Bent wheel | True it gently |
| Glazed pads | Lightly sand them |
If the sound stays, you’ll feel less alone via testing brake contact again. Small changes help you bring back smooth, quiet stopping and keep your ride feeling solid.
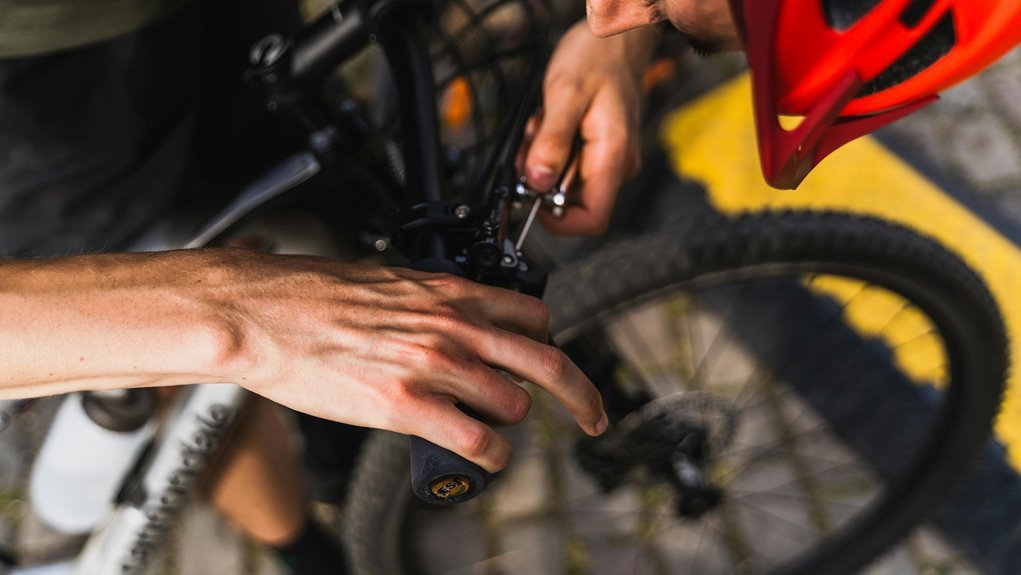
Align Disc Brake Calipers
Before you chase rotor straightness or pad feel, start with the caliper itself, because even a tiny shift can throw off the whole brake.
You’re part of the fix here, and it’s simpler than it looks. Loosen the mounting bolts just enough for movement, then squeeze the brake lever so the caliper hugs the rotor. Hold that squeeze while you tighten the bolts evenly. This caliper centering gives you clean rotor clearance and helps both pads share the work.
- Check that the wheel sits fully in the dropouts.
- Spin the wheel and watch the gap on both sides.
- Recheck bolt tightness without forcing anything.
- Make small tweaks until the rotor runs quiet.
Test Your Brake Adjustment
Once you’ve made the main brake adjustments, test them with a calm, careful check so you can catch small issues before they turn into annoying rides.
Squeeze each lever and notice the brake feel. It should feel firm, smooth, and even on both sides.
Then roll the bike forward and do a gentle stopping test in a safe spot. Whenever the bike pulls, chatters, or rubs, go back and fine-tune the caliper, pads, or cable tension.
Spin each wheel and listen for scrape marks that hint at a bent rotor or a pad out of place.
You’re not chasing perfection for bragging rights here. You’re building trust in your bike, and that makes every ride feel more relaxed, more connected, and a lot more fun.
Frequently Asked Questions
How Do I Know if My Wheel Is Seated Correctly in the Dropouts?
You can check the wheel by confirming that the axle is fully nested in both dropouts, the wheel stays centered, and there is no movement when you try to twist it by hand. Tighten the skewer or axle to the correct tension, then test it again for any play.
What Causes Brake Pads to Wear Unevenly Over Time?
Uneven pad wear happens when the caliper sits off center, the rotor is warped, or the pad surface has defects or contamination that changes how it meets the rotor. If the wheel is not seated properly, one side will take more load and wear faster.
How Can I Tell if My Rotor Is Bent Without Tools?
Lift the wheel, spin it, and watch the rotor edge closely. If it moves side to side or drags against the brake pads at one point in the rotation, the rotor is probably bent.
Which Tool Adjusts Caliper Side-To-Side on Modern Disc Brakes?
You use a 5 mm Allen bolt, T25 Torx, or 4 mm Allen bolt. For caliper centering and brake alignment, squeeze the lever, tighten the mounting bolts, and the caliper is aligned.
When Should I Use the Barrel Adjuster Instead of Cable Tensioning?
Use the barrel adjuster for small, tool free brake adjustments and for taking up cable stretch. It lets you fine tune brake feel without resetting the cable tension.