Bike brakes need a quick check of noise, wheel runout, lever feel, and brake type. Then adjust lever reach, pad position, cable tension, and rub control. Small setup issues often steal stopping power. Fixing them can make the bike stop much better.
Spot Bike Brake Problems Quickly
Before you reach for the wrench, check the simple stuff initially, because most brake problems show up in a few clear ways.
You can often spot trouble via listening for brake noise patterns like squeal, scraping, or clicking. Then look at the wheel while it spins. When you see wheel wobble signs, your brake might rub only on part of the turn.
Also, watch how the lever feels. A soft pull or a lever that nearly hits the handlebar tells you something’s off.
Next, check whether the pads touch the rim evenly and whether the wheel sits straight in the frame.
These quick checks help you stay calm, save time, and feel like you’re fixing the bike with the same steady crew.
Identify Your Brake Type
Once you know the brake type on your bike, the rest of the adjustment work gets much easier. Start with a quick brake type overview. Check whether you have rim brakes or disc brakes, then look closer for mechanical hydraulic differences. Mechanical systems use a cable, so you’ll see a visible wire running to the brake. Hydraulic systems use fluid lines, which look smoother and sealed.
Whenever you ride with others, this little check helps you speak the same brake language and fix things faster. Next, match the style to the parts on your bike. Caliper, V-brake, cantilever, and disc setups all need different attention.
Upon identifying the right system initially, you save time, avoid guesswork, and get closer to that confident, group ride stop you want.
Set Up Brake Lever Reach
Set your brake lever reach so your fingers land naturally on the lever without stretching or crowding. Check where your index finger rests when you grip the bars, then adjust the reach so the lever feels steady and easy to pull.
A good fit helps you brake with more control and keeps your hand comfortable on longer rides.
Lever Reach Basics
A comfortable brake lever can make every ride feel smoother and safer, so lever reach is worth getting right. You want the lever close enough that your fingers wrap it without stretching, but not so close that it feels cramped. Good reach ergonomics help you keep control and stay relaxed, especially on longer rides.
| Check | What you feel | Fix |
|---|---|---|
| Too far | Finger strain | Move lever in |
| Too close | Pinched hand | Move lever out |
| Just right | Easy pull | Keep setting |
When you test lever travel, aim for a smooth pull before the brake bites. Small changes can make a big difference, and that’s part of the club. Adjust both sides evenly, then squeeze again until the feel matches your hand and riding style.
Finger Placement Check
Now that your brake lever reach feels right, check where your finger actually lands on the lever. You want your index finger to rest on the sweet spot, not slide too far in or hang off the edge. That small detail helps you keep steady grip pressure and clean hand posture when you brake.
- Place one finger on the lever and notice the contact point.
- Keep your wrist relaxed so your hand stays lined up.
- Squeeze once and see whether the lever meets your finger beforehand and cleanly.
Should your finger lands awkwardly, your control can feel shaky, and you might miss the smooth, sure stop you’re after. Make tiny changes, then test again. You’re not chasing perfection here, just a setup that feels like it belongs to you.
Adjust For Comfort
When your brake lever reach feels close but still not quite right, adjust it for comfort so your hand can relax and still brake hard whenever you need to. Start by moving the reach screw or dial a little at a time. Then squeeze the lever with your normal riding fingers and check whether your hand rests naturally on the bar.
You want solid handlebar comfort, not a stretch that makes you hunt for the brake. If the lever sits too far in, your grip pressure can spike and tire your fingers. If it sits too far out, you may lose control. Make tiny changes, test on the bike, and keep both sides even. That way, you’ll feel ready, steady, and part of the ride.
Align Brake Pads for Better Bite
You want each pad to meet the rim at a flat, even contact angle, because that gives you stronger, cleaner braking. Check that the pads sit on the braking track and don’t touch the tire, then set a slight toe-in so the front edge hits first and stays quiet. As soon as the pads line up well, you’ll feel better bite right away, and the brake lever won’t make you guess anymore.
Pad Contact Angle
Because brake pads do their best work only once they meet the rim at the right angle, pad contact angle matters just as much as pad position. You want the pad to touch flat, with a slight toe in, so the front meets first and the rest follows. That small tilt helps your brake feel calm and strong, and it can smooth out pad wear patterns over time.
When the braking surface angle looks off, your stop may feel grabby or noisy, like the bike’s trying to sing without practice.
- Loosen the pad bolt just enough to move it.
- Aim the pad at the rim’s braking track.
- Tighten it while keeping that gentle angle.
When you ride with a friendly setup, each squeeze feels more confident, and you do too.
Rim Alignment Check
A quick rim alignment check can save you from a lot of noisy, tricky braking, and it usually takes only a few careful looks. You belong in a smoother ride, so start with a wheel seating inspection. Make sure the wheel sits fully in the dropouts, then spin it and watch the rim pass through the brake pads.
If the rim wobbles, your pads can’t grab well. Next, do rim trueness verification by checking for side-to-side hops or dents along the braking surface. Keep the pads centered on the rim, not drifting toward the tire or below the track.
When the rim runs straight, your brakes feel firm, quiet, and confident. That little check helps you trust every stop, even on a busy street.
Toe-In Adjustment
Once your rim runs straight, set your eyes on the brake pads, since even a small pad angle can change how the bike feels at the lever. You want pad toe in, which means the front edge touches the rim just before the back edge. That slight angle helps squeal reduction and gives you a calmer stop. Loosen the pad bolt, press the pad against the rim, and tilt the front in a hair. Then tighten it while you hold that spot.
- Check that the pad stays on the braking track.
- Match both sides so your brakes feel even.
- Spin the wheel and listen for noise.
When you dial this in, you join the riders who trust their bikes on every downhill.
Adjust Rim Brake Cable Tension
When your rim brake lever pulls too close to the handlebar, the cable likely needs a small tension fix. You can start with cable stretch compensation by turning the barrel adjuster out a little, then test the lever again.
Should that still feel soft, look for housing friction diagnosis: a sticky cable or bent housing can hide real tension. Next, slide the boot back, seat the noodle fully, and pull the cable snug by hand.
Tighten the anchor bolt, then squeeze the lever to feel for a firm, friendly bite. Keep tiny moves and recheck often. Should the pads sit too far from the rim, add a touch more tension. Should they drag, ease it back.
You’ve got this, and your brakes will feel more confident.
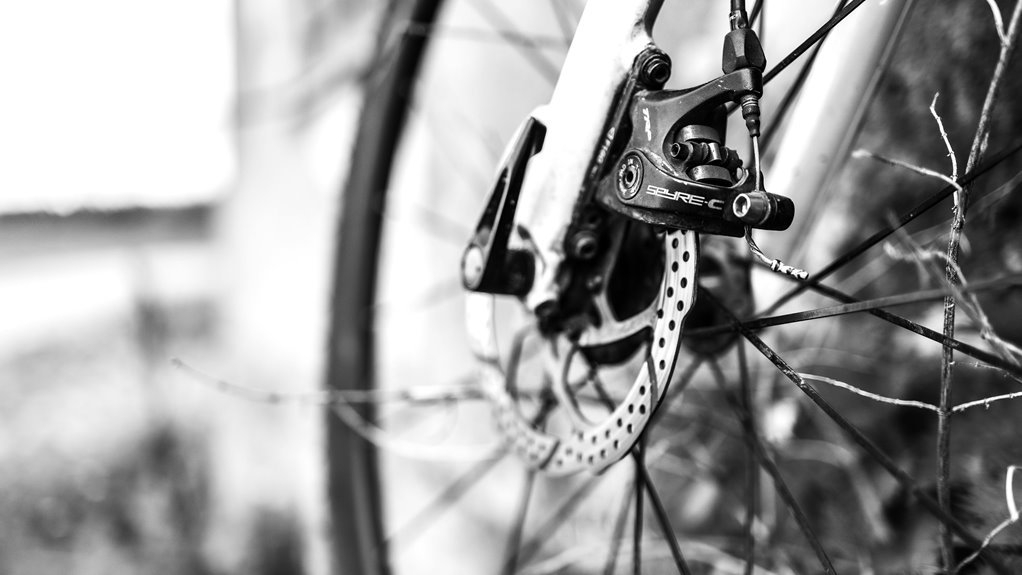
Adjust Disc Brake Calipers
You can start by loosening the caliper just enough so it can move, then squeeze the brake lever to help it center around the rotor.
As you tighten the bolts, keep an eye on caliper alignment so the pads sit evenly on both sides.
Once the rotor is centered, your brake should spin freely without that annoying scrape that always shows up at the worst time.
Caliper Alignment
At the caliper itself, a small alignment tweak can make the whole brake feel calm and smooth again. You’ll want to check caliper pivot security initially, because a loose base throws everything off. Then use mounting bolt access to loosen the bolts just enough so the body can move. Squeeze the lever gently, and let the caliper settle where both pads sit evenly.
- Hold the lever while you snug the bolts.
- Spin the wheel and listen for rub.
- Recheck the bolts after a short test ride.
If the brake still feels off, make tiny shifts and try again. You’re not alone in this step.
With patience, you can give your bike that clean, confident stop your ride group will notice.
Rotor Centering
Because a disc brake can sound fussy even whenever it’s only a little off, rotor centering starts with giving the caliper a clean, true home over the rotor. Loosen the mounting bolts just enough to let it float, then squeeze the lever so the pads hug the rotor evenly. While you hold it, snug the bolts so the caliper settles in place.
After that, spin the wheel and listen for rub. Whenever you hear a tick, check rotor trueness and rotor lateralism, then nudge the caliper a hair toward the quiet side. Small moves matter here, and you’re not doing it wrong whenever it takes two tries.
When both sides clear smoothly, your brake feels calmer, and you do too.
Stop Brake Rub and Drag
Brake rub and drag usually start with a small setup problem, not a big failure, so don’t panic should your wheel feel a little sticky. You can fix most cases with a calm wheel trueness inspection and a brake housing contamination check.
First, spin the wheel and watch the gap. If it wobbles, center it in the dropouts and retighten the release. Then check the pads. They should sit evenly and clear the rim when you’re off the lever.
- Look for a bent rim or loose wheel.
- Clean grit from the brake path.
- Recheck cable tension after each change.
Next, loosen the caliper just enough to let it float, squeeze the lever, and tighten it again. That simple reset often puts everything back in line, and you’ll feel right at home on the bike.
Bed In New Brake Pads
Fresh brake pads can feel grabby or weak at initial, even while you set them up correctly, so don’t let that worry you.
You’re just starting the brake pad break in, and that initial ride is part of the pad bedding process. Find a safe, quiet stretch, then brake firmly from a moderate speed and roll again without stopping fully. Repeat this several times so the pad face mates with the rim or rotor.
Keep your pressure smooth, not frantic, and give the brakes a short cool down between efforts. As the pads settle, you’ll feel stronger bite and more control. If you ride with others, you’re not behind; you’re just letting your brakes join the team.
Choose the Right Brake Pad Compound
Choosing the right brake pad compound can make your bike feel calm, confident, and a lot less mysterious.
You want a compound that matches your riding style, so your brakes feel like part of your crew, not a stranger on the trail. Softer pads usually grip better in wet weather, while harder pads often give better pad compound durability for long rides and city miles.
- Use resin pads when you want quiet braking and smooth feel.
- Pick metallic pads whenever you need stronger heat control and pad compound weathering.
- Match the compound to your rims or rotors so you avoid awkward wear.
When you choose well, every stop feels steadier, and your bike responds the way you hoped it would.
Test Your Bike Brake Adjustment
Now that your brake pads match your riding style, it’s time to make sure the whole system works the way you expect.
Start with a brake feel test. Squeeze each lever and notice whether it feels firm, smooth, and quick to respond. Should the lever sinks too far, add tension and try again.
Next, roll in a safe area and do a stopping distance check at low speed. You want both brakes to grab evenly, not surprise you like a sudden rain shower. Watch for rubbing, squealing, or pulling to one side.
Then repeat the test after a few hard stops, because parts can settle. Once the bike feels balanced, you’ll ride with more confidence and join the road crew with satisfaction.
Frequently Asked Questions
How Do I Know if My Brake Levers Are the Correct Size?
You have the right brake lever size when your fingers land on the levers naturally and you can pull them without forcing your grip. The reach should match your hand so you do not need to stretch or bend your wrist awkwardly.
What Tools Are Best for Replacing Worn Brake Cables?
Use cable cutters, hex keys, and needle nose pliers. You may also need cable housing gauges and stainless cable options to match your setup. Choose tools that let you fit, trim, and secure cables with precision.
Can Brake Noise Indicate a Bent Wheel Rim?
Yes, it can. Check the rim for runout during wheel inspection. If you hear rubbing, squealing, or pulsing, the wheel may be bent or out of alignment, and inspecting it can help you pinpoint the cause.
How Often Should Brake Pads Be Replaced on a Bike?
Replace bike brake pads every 1,000 to 3,000 miles, but inspect them regularly. At each wear check, note factors that shorten pad life, such as wet rides, steep hills, and hard braking, then replace them before they become too thin.
Do Different Weather Conditions Affect Brake Adjustment?
Yes. Weather can change brake setup. In rain and grit, pad wear can increase, so check alignment more often. For wet weather brake tuning, tighten cable tension and re-center the pads for stronger stops.